MyBatisのMapperはGroovyで書くことにした

MyBatisのMapperでSQL書くにあたって、複数行に渡るSQL書くのにヒアドキュメントが使いたくて、まずはKotlinを試しました。

ただ、ElicpseでKotlinを書こうとすると、importの自動補完が効かず、ちょっと面倒だったので、Groovyを試しました。(本当は、KotlinのままIntelliJ IDEAが導入できればいいんですが、、)

package com.example.repository

import org.apache.ibatis.annotations.Delete
import org.apache.ibatis.annotations.Insert
import org.apache.ibatis.annotations.Mapper
import org.apache.ibatis.annotations.Param
import org.apache.ibatis.annotations.Select
import org.apache.ibatis.annotations.SelectKey
import org.apache.ibatis.annotations.Update
import org.springframework.stereotype.Repository

import com.example.domain.Customer

@Repository
@Mapper
public interface CustomerRepository {

    @Select("SELECT * FROM customers ORDER BY id")
    public List<Customer> findAll()

    @Select("SELECT * FROM customers WHERE id = #{id}")
    public Customer findOne(@Param("id") Integer id)

    @Insert("INSERT INTO customers(first_name, last_name, address) VALUES(#{firstName}, #{lastName}, #{address})")
    @SelectKey(statement = "call identity()", keyProperty = "id", before = false, resultType = int.class)
    public void insert(Customer customer)

    @Update("UPDATE customers SET first_name = #{firstName}, last_name = #{lastName}, address = #{address} WHERE id = #{id}")
    public void update(Customer customer)

    @Delete("DELETE FROM customers WHERE id = #{id}")
    public void delete(@Param("id") Integer id)

    @Select('''
      SELECT
        *
      FROM
        customers
      WHERE
        first_name LIKE '%${firstName}%'
      ORDER BY id''')
    public List<Customer> findByFirstName(@Param("firstName") String firstName)

    @Delete("DELETE FROM customers")
    public void deleteAll()
}

全体のコードは下記にあります。

ほとんどJavaで書いたときと同じになるのと、importの補完も効くので、今後MyBatisのMapperはGroovyで書こうと思っています。

ちなみに、他のファイル(MyBatisでも別ファイルにSQL書けます)にSQLを書くのではなく、ソース上に書きたいのは、やはり情報は一箇所にまとまっていたほうがわかりやすいと思っているからです。他のファイルに書くことによって、SQLの変更が楽になる(IDEでハイライトが利くとか)、、ってような話もありますが、きっと実行したSQLを貼り付けると思うので、どこに書いても正直同じだと思いますし、だったらコードと一緒に見えたほうがわかりやすいと思っています。(Javaがヒアドキュメント使えていれば、他のファイルにSQL書くような流れって、もっとすくなかったのでは)

DomaはIDE上でメソッドに対応するSQLファイルに飛べるので、そういったストレスは少なくていいですね。

Spring BootでのDBアクセス方法(JDBC、JPA、MyBatis)について

Spring BootでのDBアクセス方法として、下記の3パターンを試してみました。

  • JDBC(spring-boot-starter-jdbc)
  • JPA(spring-boot-starter-data-jpa)
  • MyBatis(mybatis-spring-boot-starter)

なお、それぞれの全体のコードは、下記に配置してあります。

テーブル構成

DBはH2を使います。DDLは下記の通りです。

CREATE TABLE customers (
    id INT PRIMARY KEY AUTO_INCREMENT,
    first_name VARCHAR(30) NOT NULL,
    last_name VARCHAR(30) NOT NULL,
    address VARCHAR(100)
);

実装する処理

基本的なCRUDにプラスして、first_nameカラムを部分一致で検索するものを実装します。

Entityは下記のように定義します。(JPAだけ追加でアノテーションが必要なので後述します)

package com.example.domain;

import lombok.AllArgsConstructor;
import lombok.Data;
import lombok.NoArgsConstructor;

@Data
@AllArgsConstructor
@NoArgsConstructor
public class Customer {

    private Integer id;

    private String firstName;

    private String lastName;

    private String address;
}

JDBC

NamedParameterJdbcTemplateを利用します。

SQL自体は書きますが、Entityとのマッピングが簡単になります。

package com.example.repository;

import java.util.HashMap;
import java.util.List;

import org.springframework.beans.factory.annotation.Autowired;
import org.springframework.dao.EmptyResultDataAccessException;
import org.springframework.jdbc.core.BeanPropertyRowMapper;
import org.springframework.jdbc.core.JdbcTemplate;
import org.springframework.jdbc.core.namedparam.BeanPropertySqlParameterSource;
import org.springframework.jdbc.core.namedparam.MapSqlParameterSource;
import org.springframework.jdbc.core.namedparam.NamedParameterJdbcTemplate;
import org.springframework.jdbc.core.namedparam.SqlParameterSource;
import org.springframework.jdbc.core.simple.SimpleJdbcInsert;
import org.springframework.stereotype.Repository;

import com.example.domain.Customer;

@Repository
public class CustomerRepository {

    @Autowired
    private NamedParameterJdbcTemplate jdbcTemplate;

    public List<Customer> findAll() {

        return jdbcTemplate.query(
                "SELECT * FROM customers ORDER BY id",
                new BeanPropertyRowMapper<Customer>(Customer.class));
    }

    public Customer findOne(Integer id) {

        SqlParameterSource param = new MapSqlParameterSource().addValue("id", id);

        try {
            return jdbcTemplate.queryForObject(
                    "SELECT * FROM customers WHERE id = :id",
                    param,
                    new BeanPropertyRowMapper<Customer>(Customer.class));
        } catch (EmptyResultDataAccessException e) {
            return null;
        }
    }

    public Customer save(Customer customer) {

        SqlParameterSource param = new BeanPropertySqlParameterSource(customer);

        if (customer.getId() == null) {

            SimpleJdbcInsert insert =
                    new SimpleJdbcInsert((JdbcTemplate) jdbcTemplate.getJdbcOperations())
                            .withTableName("customers")
                            .usingGeneratedKeyColumns("id");

            Number key = insert.executeAndReturnKey(param);
            customer.setId(key.intValue());
        } else {
            jdbcTemplate.update(
                    "UPDATE customers SET first_name = :firstName, last_name = :lastName, address = :address WHERE id = :id",
                    param);
        }

        return customer;
    }

    public void delete(Integer id) {

        SqlParameterSource param = new MapSqlParameterSource().addValue("id", id);

        jdbcTemplate.update(
                "DELETE FROM customers WHERE id = :id",
                param);
    }

    public List<Customer> findByFirstName(String firstName) {

        SqlParameterSource param = new MapSqlParameterSource().addValue("firstName", "%" + firstName + "%");

        return jdbcTemplate.query(
                "SELECT * FROM customers WHERE first_name LIKE :firstName ORDER BY id",
                param,
                new BeanPropertyRowMapper<Customer>(Customer.class));
    }

    public void deleteAll() {

        jdbcTemplate.update("DELETE FROM customers", new HashMap<>());
    }
}

JPA

EntityにもJPA用のアノテーションが必要となります。

package com.example.domain;

import javax.persistence.Entity;
import javax.persistence.GeneratedValue;
import javax.persistence.Id;
import javax.persistence.Table;

import lombok.AllArgsConstructor;
import lombok.Data;
import lombok.NoArgsConstructor;

@Entity
@Table(name = "customers")
@Data
@AllArgsConstructor
@NoArgsConstructor
public class Customer {

    @Id
    @GeneratedValue
    private Integer id;

    private String firstName;

    private String lastName;

    private String address;
}

JpaRepositoryを継承したinterfaceを定義するだけで、基本的なCRUD操作用のメソッド(find, findOne, save, delete 等)が提供されます。

また、メソッド名からクエリを作り出してくれる機能もあり、findByFirstNameContainsとすると、first_nameに対してLIKEで部分一致とするクエリを実行するメソッドとなります。

EntityManagerを使うことも無く、とても簡単に書けます。

package com.example.repository;

import java.util.List;

import org.springframework.data.jpa.repository.JpaRepository;
import org.springframework.data.jpa.repository.Query;
import org.springframework.data.repository.query.Param;
import org.springframework.stereotype.Repository;

import com.example.domain.Customer;

@Repository
public interface CustomerRepository extends JpaRepository<Customer, Integer> {

    public List<Customer> findByFirstNameContains(String firstName);
}

MyBatis

インタフェースを定義し、アノテーションでSQLを指定します。

JDBCの時のようにSQLを書くことになりますが、アノテーションで済ませられるので、より完結に書けます。

package com.example.repository;

import java.util.List;

import org.apache.ibatis.annotations.Delete;
import org.apache.ibatis.annotations.Insert;
import org.apache.ibatis.annotations.Mapper;
import org.apache.ibatis.annotations.Param;
import org.apache.ibatis.annotations.Select;
import org.apache.ibatis.annotations.SelectKey;
import org.apache.ibatis.annotations.Update;
import org.springframework.stereotype.Repository;

import com.example.domain.Customer;

@Repository
@Mapper
public interface CustomerRepository {

    @Select("SELECT * FROM customers ORDER BY id")
    public List<Customer> findAll();

    @Select("SELECT * FROM customers WHERE id = #{id}")
    public Customer findOne(@Param("id") Integer id);

    @Insert("INSERT INTO customers(first_name, last_name, address) VALUES(#{firstName}, #{lastName}, #{address})")
    @SelectKey(statement = "call identity()", keyProperty = "id", before = false, resultType = int.class)
    public void insert(Customer customer);

    @Update("UPDATE customers SET first_name = #{firstName}, last_name = #{lastName}, address = #{address} WHERE id = #{id}")
    public void update(Customer customer);

    @Delete("DELETE FROM customers WHERE id = #{id}")
    public void delete(@Param("id") Integer id);

    @Select("SELECT * FROM customers WHERE first_name LIKE '%' || #{firstName} || '%' ORDER BY id")
    public List<Customer> findByFirstName(@Param("firstName") String firstName);

    @Delete("DELETE FROM customers")
    public void deleteAll();
}

MyBatis(Kotlin)

Javaだとヒアドキュメントが書けないので、複数行にわたるようなSQLを書くのに不便です。

ということで、ヒアドキュメントが使えるKotlinで書いてみます。

package com.example.repository

import com.example.domain.Customer
import org.apache.ibatis.annotations.Delete
import org.apache.ibatis.annotations.Insert
import org.apache.ibatis.annotations.Mapper
import org.apache.ibatis.annotations.Param
import org.apache.ibatis.annotations.Select
import org.apache.ibatis.annotations.SelectKey
import org.apache.ibatis.annotations.Update

@Mapper
interface CustomerRepository {

    @Select("SELECT * FROM customers ORDER BY id")
    fun findAll(): List<Customer>

    @Select("SELECT * FROM customers WHERE id = #{id}")
    fun findOne(@Param("id") id: Int): Customer

    @Insert("INSERT INTO customers(first_name, last_name, address) VALUES(#{firstName}, #{lastName}, #{address})")
    @SelectKey(statement = arrayOf("call identity()"), keyProperty = "id", before = false, resultType = Int::class)
    fun insert(customer: Customer)

    @Update("UPDATE customers SET first_name = #{firstName}, last_name = #{lastName}, address = #{address} WHERE id = #{id}")
    fun update(customer: Customer)

    @Delete("DELETE FROM customers WHERE id = #{id}")
    fun delete(@Param("id") id: Int);

    @Select("""
        SELECT
          *
        FROM
          customers
        WHERE
          first_name LIKE '%' || #{firstName} || '%'
        ORDER BY id
    """)
    fun findByFirstName(@Param("firstName") firstName: String): List<Customer>

    @Delete("DELETE FROM customers")
    fun deleteAll()
}

まとめ

シンプルな操作だけならば、JPAがインタフェースを定義するだけなのでとてもらくちんです。 ただ、JPAは多機能で嵌りどころも多いイメージ(理解して使わないと危険)なので、今の自分の知識だとMyBatisがあっているかなと考えています。

MyBatisを使う場合に、ヒアドキュメントを使えるKotlinでMapper部分だけでも書こうと考えていましたが、EclipseのKotlinプラグインだと、importの補完をしてくれないので、結構面倒に感じました(IntelliJ IDEA使えれば、、)。 ここはGroovyも試してみようと考えています。

社内勉強会で「Spring Bootを触ってみた」というタイトルで発表しました

Spring Bootが楽しいので、社内勉強会で「Spring Bootを触ってみた」というタイトルでLTしてきました。

www.slideshare.net

内容が薄くなってしまったので、もっと使い込んだら、もう少し長い時間でやりたいなぁと思っています。

Spring Boot がとても楽しい

Spring Boot を勉強し始めて、いろいろ楽しいので、いったんここにまとめてみます。

ここで書いている内容は、下記のリポジトリで試している内容になります。(今後もいろいろ試すので、リポジトリの内容はどんどん変わっていくかもしれません…)

またSpring projectでも、たくさんのサンプルが公開されていてとても参考になります。

Spring Bootを使うと、さまざまなコンポーネントを組み合わせて、よい感じのアプリケーション構成に仕上げてくれます。ちょっとうまく言い表せないのですが、、いろいろなコンポーネントを組み合わせて、結果的にフルスタックのフレームワークのような機能を提供してくれている感じです。組み合わせ自体はSpring Bootが解決してくれるので、そこで迷うことはありません。

サンプルとしてRESTなアプリケーションを書いてみましたが、APIを簡単に作れるのは当然で、それに対する試験だったり、DBのマイグレーションなどといった仕組みも簡単に試すことが出来ました。

APIの作成

@RestControllerアノテーションを付与したクラスが、RESTのAPIとして公開されます。

Jersey でもそうですが、アノテーションだけで済むので、とっても簡単です。

package com.example.api;

import java.util.List;

import org.springframework.beans.factory.annotation.Autowired;
import org.springframework.http.HttpStatus;
import org.springframework.web.bind.annotation.DeleteMapping;
import org.springframework.web.bind.annotation.GetMapping;
import org.springframework.web.bind.annotation.PathVariable;
import org.springframework.web.bind.annotation.PostMapping;
import org.springframework.web.bind.annotation.RequestBody;
import org.springframework.web.bind.annotation.RequestMapping;
import org.springframework.web.bind.annotation.RequestParam;
import org.springframework.web.bind.annotation.ResponseStatus;
import org.springframework.web.bind.annotation.RestController;

import com.example.domain.Customer;
import com.example.service.CustomerService;

@RestController
@RequestMapping("api/customers")
public class CustomerRestController {

    @Autowired
    private CustomerService customerService;

    @GetMapping
    public List<Customer> getCustomers() {
        return customerService.findAll();
    }

    @GetMapping(path = "{id}")
    public Customer getCustomer(@PathVariable Integer id) {
        return customerService.findOne(id);
    }

    @GetMapping(path = "/search")
    public List<Customer> getCustomersByName(@RequestParam String name) {
        return customerService.findByName(name);
    }

    @PostMapping
    @ResponseStatus(HttpStatus.CREATED)
    public Customer craeteCustomer(@RequestBody Customer customer) {
        return customerService.create(customer);
    }

    @PostMapping(path = "{id}")
    public Customer upateCustomer(@PathVariable Integer id, @RequestBody Customer customer) {
        customer.setId(id);
        return customerService.update(customer);
    }

    @DeleteMapping(path = "{id}")
    @ResponseStatus(HttpStatus.NO_CONTENT)
    public void deleteCustomer(@PathVariable Integer id) {
        customerService.delete(id);
    }
}

データアクセス部分

簡単なCRUDならば、JPAを使うのがよいかと思います。Spring DATA JPAは、JPAをとても使いやすくしてくれています。 基本的にはインタフェースを定義するだけです。EntityManagerを触ることはありません。

JpaRepositoryをextendsするだけで、CRUDのメソッドを提供してくれます。

package com.example.repository;

import org.springframework.data.jpa.repository.JpaRepository;
import org.springframework.stereotype.Repository;

import com.example.domain.Customer;

@Repository
public interface CustomerRepository extends JpaRepository<Customer, Integer> {
}

他にもメソッド名にあわせて自動的にSQLを作成してくれたり、アノテーションでクエリを指定できたりと便利です。

また、単純なデータアクセスのAPIならば、@RestControler使わずに、@Repositoryを直接APIとして公開することができます。

複雑なクエリになる場合は、JPAだと使いこなせる自信が無いので、MyBatisを使おうと考えています。MyBatisもSpring Bootと連携できます。

DBのマイグレーション

DBのマイグレーション方法としてFlywayを使った方法が提供されています。

アプリケーションの起動時に、Flywayが実行されるイメージです。クラスパス上のdb/migration配下 に配置したSQLが実行されます。

APIのドキュメント生成

SpringFoxを使うと、SpringのアノテーションからSwagger JSONを生成してくれます。

SpringFoxを依存関係に追加して、下記のようなクラスを定義しておくだけです。

import org.springframework.context.annotation.Bean;
import org.springframework.context.annotation.Configuration;

import com.google.common.base.Predicate;
import com.google.common.base.Predicates;

import springfox.documentation.builders.ApiInfoBuilder;
import springfox.documentation.service.ApiInfo;
import springfox.documentation.spi.DocumentationType;
import springfox.documentation.spring.web.plugins.Docket;
import springfox.documentation.swagger2.annotations.EnableSwagger2;

@Configuration
@EnableSwagger2
public class SwaggerConfig {

    @Bean
    public Docket document() {
        return new Docket(DocumentationType.SWAGGER_2)
                .select()
                .paths(paths())
                .build()
                .apiInfo(apiInfo());
    }

    @SuppressWarnings("unchecked")
    private Predicate<String> paths() {
        return Predicates.or(Predicates.containsPattern("/api/*"));
    }

    private ApiInfo apiInfo() {
        return new ApiInfoBuilder()
                .title("Example API")
                .version("1.0")
                .build();
    }
}

さらにSwagger UIと組み合わせて、APIのドキュメントがアプリケーション上で確認できます。
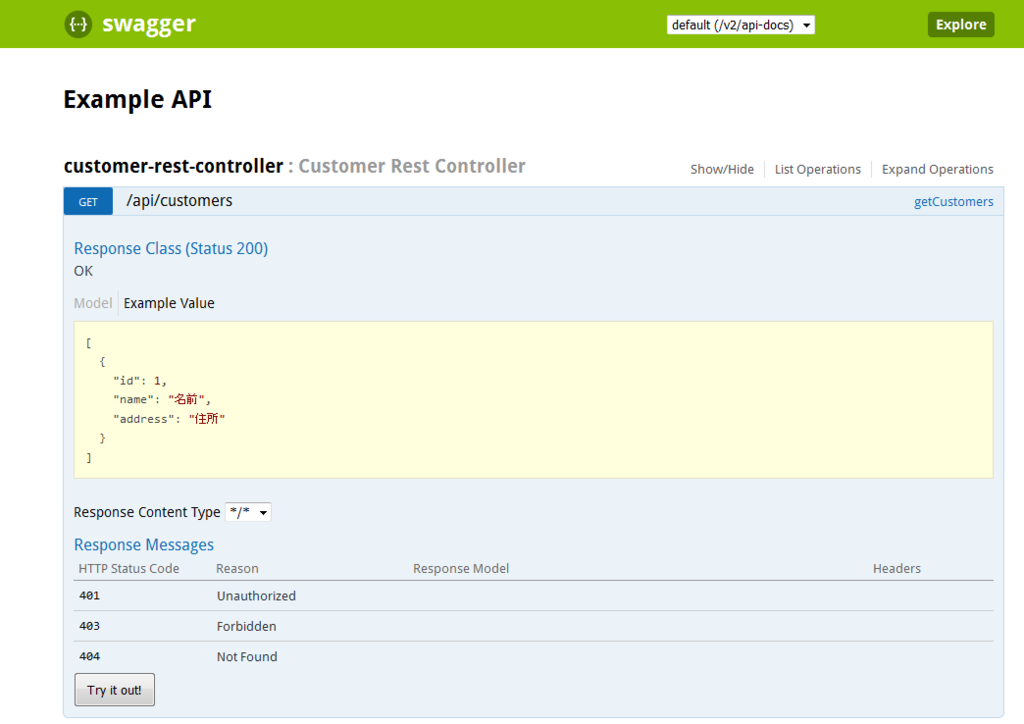
f:id:onozaty:20161210005706p:plain

Swagger UIの良いところは、そこから直接APIを叩いて確認ができるところです。いちいちcurlコマンドで確認するなどといった必要が無くなります。

テスト

テスト方法もいろいろ提供されています。

RESTのAPIに対する結合テストは、下記のような感じです。TestRestTemplateクラスが、RESTのテストを行うのに便利です。

package com.example;

import static org.assertj.core.api.Assertions.assertThat;

import java.util.Arrays;
import java.util.List;

import org.junit.Before;
import org.junit.Test;
import org.junit.runner.RunWith;
import org.springframework.beans.factory.annotation.Autowired;
import org.springframework.boot.test.context.SpringBootTest;
import org.springframework.boot.test.context.SpringBootTest.WebEnvironment;
import org.springframework.boot.test.web.client.TestRestTemplate;
import org.springframework.core.ParameterizedTypeReference;
import org.springframework.http.HttpMethod;
import org.springframework.http.HttpStatus;
import org.springframework.http.ResponseEntity;
import org.springframework.test.context.junit4.SpringRunner;

import com.example.domain.Customer;
import com.example.repository.CustomerRepository;

@RunWith(SpringRunner.class)
@SpringBootTest(webEnvironment = WebEnvironment.RANDOM_PORT, properties = {
        "spring.datasource.url=jdbc:log4jdbc:h2:mem:test;DB_CLOSE_ON_EXIT=FALSE" })
public class SpringBootRestJpaApplicationTests {

    @Autowired
    private TestRestTemplate restTemplate;

    @Autowired
    private CustomerRepository customerRepository;

    private Customer customer1;
    private Customer customer2;
    private Customer customer3;

    @Before
    public void setup() {

        customerRepository.deleteAll();

        customer1 = new Customer();
        customer1.setName("Taro");
        customer1.setAddress("Tokyo");

        customer2 = new Customer();
        customer2.setName("花子");
        customer2.setAddress("千葉");

        customer3 = new Customer();
        customer3.setName("Taku");

        customerRepository.save(Arrays.asList(customer1, customer2, customer3));
    }

    @Test
    public void getCustomers() {

        ResponseEntity<List<Customer>> response = restTemplate.exchange(
                "/api/customers", HttpMethod.GET, null, new ParameterizedTypeReference<List<Customer>>() {
                });

        assertThat(response.getStatusCode()).isEqualTo(HttpStatus.OK);
        assertThat(response.getBody()).containsOnly(customer1, customer2, customer3);
    }

    @Test
    public void getCustomer() {

        ResponseEntity<Customer> response = restTemplate.getForEntity(
                "/api/customers/{id}", Customer.class, customer1.getId());

        assertThat(response.getStatusCode()).isEqualTo(HttpStatus.OK);
        assertThat(response.getBody()).isEqualTo(customer1);
    }

    @Test
    public void getCustomersByName() {

        ResponseEntity<List<Customer>> response = restTemplate.exchange(
                "/api/customers/search?name=a", HttpMethod.GET, null, new ParameterizedTypeReference<List<Customer>>() {
                });

        assertThat(response.getStatusCode()).isEqualTo(HttpStatus.OK);
        assertThat(response.getBody()).containsOnly(customer1, customer3);
    }

    @Test
    public void createCustomer() {

        Customer newCustomer = new Customer();
        newCustomer.setName("Tayler");
        newCustomer.setAddress("New York");

        ResponseEntity<Customer> response = restTemplate.postForEntity(
                "/api/customers", newCustomer, Customer.class);

        assertThat(response.getStatusCode()).isEqualTo(HttpStatus.CREATED);

        Customer result = response.getBody();
        assertThat(result.getId()).isEqualTo(customer3.getId() + 1); // 最後に追加したもの+1
        assertThat(result.getName()).isEqualTo("Tayler");
        assertThat(result.getAddress()).isEqualTo("New York");
    }

    @Test
    public void upateCustomer() {

        customer1.setName("New Name");

        ResponseEntity<Customer> response = restTemplate.postForEntity(
                "/api/customers/{id}", customer1, Customer.class, customer1.getId());

        assertThat(response.getStatusCode()).isEqualTo(HttpStatus.OK);
        assertThat(response.getBody()).isEqualTo(customer1);
    }

    @Test
    public void deleteCustomer() {

        {
            ResponseEntity<Void> response = restTemplate.exchange(
                    "/api/customers/{id}", HttpMethod.DELETE, null, Void.class, customer1.getId());

            assertThat(response.getStatusCode()).isEqualTo(HttpStatus.NO_CONTENT);
        }

        {
            ResponseEntity<Customer> response = restTemplate.getForEntity(
                    "/api/customers/{id}", Customer.class, customer1.getId());

            assertThat(response.getStatusCode()).isEqualTo(HttpStatus.OK);
            assertThat(response.getBody()).isNull();
        }
    }
}

テストのときだけDBの接続先を切り替えたり、空いているポートを探してサーバ立ち上げたりと、テストに必要な機能はいろいろ揃っています。

また、そもそもDIの仕組み自体が、テストがしやすい(オブジェクトをモックに差し替えたりとかが楽)です。

最後に

ざっくりとした説明になってしまいましたが、、ちょっとでも楽しさが伝わればと思います。

Spring Bootの勉強には、下記の本がとても役に立ちました。この本を最初に読んだおかげで、イメージがだいぶ掴めました。

また、サンプルコードもたくさんWeb上にあるので、今のところ嵌るといったこともなく勉強できています。

いろいろなコンポーネントがあるので、これからがさらに楽しみです。

Eclipseで「Class 'springfox.documentation.swagger.web.ClassOrApiAnnotationResourceGrouping' is marked deprecated」って警告が出る

下記の構成で Spring boot + Swagger のサンプルを作ってみたところ、

  • Eclipse 4.6.0
  • Spring Tool Suite(STS) 3.8.2
  • SpringFox 2.6.1

下記のような警告が出ました。

Class 'springfox.documentation.swagger.web.ClassOrApiAnnotationResourceGrouping' is marked deprecated

警告がひとつでもあると嫌(出ていることを許容してしまうと、他の重要な警告を見逃しかねない)なので、下記にしたがって、Eclipseの設定(SpringのValidationでBeans Validatorところ)を変えて警告が出ないようにしました。

そもそも出てしまっている理由がいまいち理解できていない(どういった形でこのクラスが参照されているのか)のですが、いったんこれで様子みることにします。

Redmine: チケットの説明欄を非表示にする(View customize plugin)

GoogleグループのRedmine Users (japanese)で、チケットの説明欄を非表示にするにはといった質問があったので、View customize pluginで対応してみました。

非表示にするだけならば、CSSで設定できる場合も多いですが、今回対象となる要素を指定するためには、xxを持った親要素といった指定が必要で、現状のCSSだとできない(CSS4でhasがあって、それが入って各ブラウザに実装されれば…)ので、JavaScriptで実施してみました。

View customize の設定内容

Path pattern

チケット画面を対象とします。

/issues

Code

Type:JavaScriptとして下記を設定します。

$(function() {
  $('#issue_description_and_toolbar').parent().hide();
  $('div.issue div.description').hide()
    .next('hr').hide();
});

設定後のイメージ

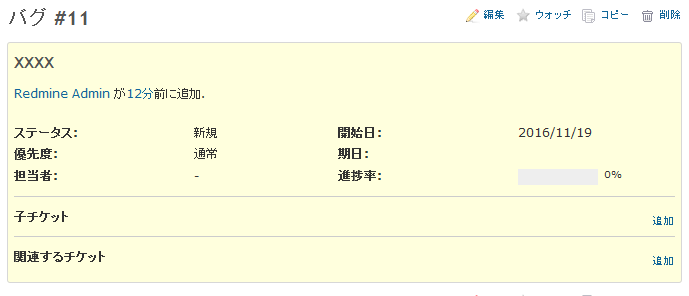
説明欄を消すことができました。

f:id:onozaty:20161120003509p:plain:w700 f:id:onozaty:20161120003512p:plain:w650

Redmine: 一部のカスタムフィールドを説明の下に移動する(View customize plugin)

といった質問をいただいたので、View customizeで試してみました。

該当の要素を取得して、それを説明欄の下に移動するイメージです。

なお、カスタムフィールドの表示は、divがネストして1行に2項目を表示しているような形になっているので、それを再現して配置します。

View customize の設定内容

Path pattern

チケット画面を対象とします。

/issues

Code

Type:JavaScriptとして下記を設定します。 cf_2のところは、移動したいカスタムフィールドに変更してください。

$(function() {
  // 対象のカスタムフィールドの要素を取得
  var customField = $('.cf_2.attribute');

  // 説明の後に移動
  $('.description')
    .after(
      $('<div class="splitcontent">')
        .append(
          $('<div class="splitcontentleft">').append(customField)));
})

設定後のイメージ

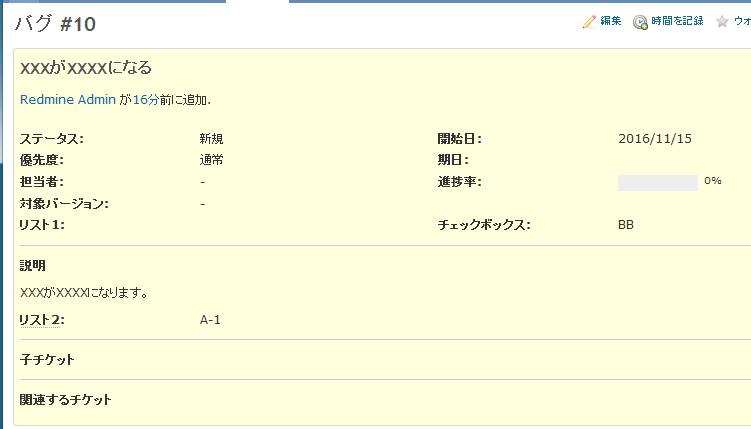
リスト2となっているカスタムフィールドが移動しました。

変更前

f:id:onozaty:20161116004019p:plain:w600

変更後

f:id:onozaty:20161116004023p:plain:w600

なお、今回は一番末尾の項目を移動したので、表示的に違和感ない形となっていますが、途中の項目を移動すると、そこだけ歯抜けになるので、きれいに見せたい場合には、詰めるような処理も必要になってきます…